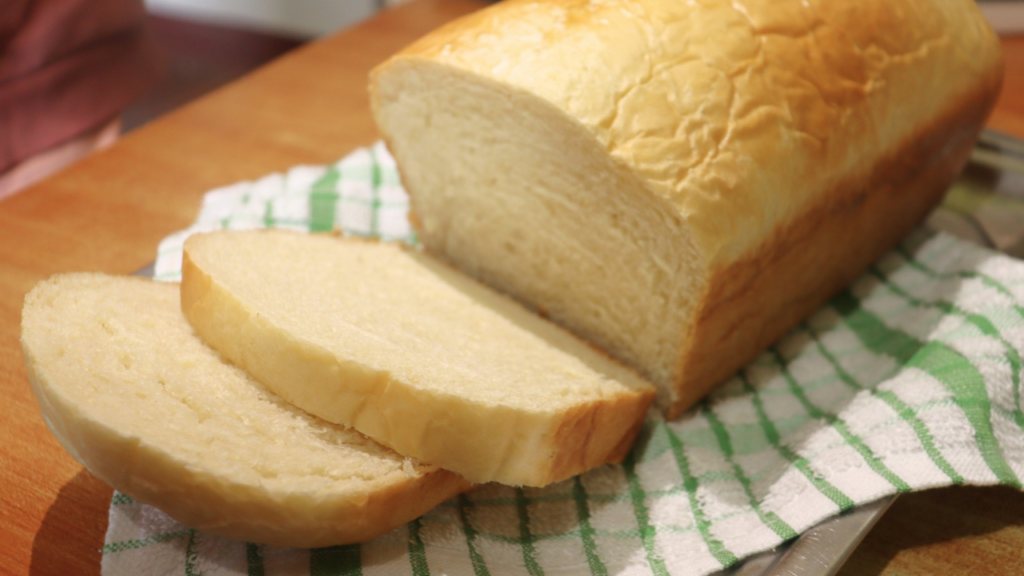
Bread is one of the most versatile foods I know. From breakfast, lunch or supper, bread will easily fit into all these categories.
You can eat it as it is. You can make a sandwich with it. You can turn a casserole into a filling dish when you add bread or easily turn it into a side dish or appetizer such as croutons.
We can go on and on when we think of the different ways we can work with bread. This is why arming yourself with an easy bread recipe is not only a good idea, it is also a timesaver. It has been for me.
Why This Bread Recipe?
The bread recipe I’m working with is simple. The ingredients are readily available and might be already in your pantry.
One of my favorite things to do is to test recipes to make them as budget-friendly as possible while maintaining the goodness of each recipe.
This has become one of our favorite bread recipes. It has also made rounds in my friends’ kitchens because it is so simple to make.
This is why I eventually shared this recipe on YouTube. You can find the YouTube video at the end of this post in a few days.
Freezing Bread
Thankfully, bread freezes very well. Making more than one loaf and keeping it to use in the future has been a game-changer for my family and me. This is especially so for our lunches.
Once you’ve baked your bread, let it cool completely. Transfer it to a freezer bag or a freezer-friendly dish. You can store your bread in the freezer for up to three months.
My bread rarely survives beyond a month in the freezer though. We usually have put it to good use within the month. That’s how useful bread is in our household.
When I need to use the bread, I usually get it out of the freezer the night before. By morning, it will have defrosted through. If you need it immediately, the quick defrost function on a microwave will do the job fast.
Baking Bread Without an Oven
Several years ago, I learned how to bake bread without an oven on my stovetop or cooker. For a long time, I baked bread in a pan or sufuria. I will soon share the process of how I did this. If you want to watch a video of this process, you can find it here.
In this post, I’m sharing how I bake bread without an oven in a bread tin. This is because there are those times you want to work with bread that is shaped in the characteristic bread shape.
If you don’t have an oven, you can use this simple method of baking your no-oven bread on your stove or cooker.
I’m using an effortless setup that anyone can work with. I’m also using readily available tools to create what I’m calling a micro-oven that will bake your bread until it is ready and has a delightful golden tinge on the surface.
Our Easy Bread Ingredients
With just 6 ingredients, make this easy bread recipe and I’m certain you will love this recipe as we do. what are these ingredients?
All-purpose flour: (or wholewheat/ atta if you’d prefer) I work with any quality all-purpose flour. I will also usually make this bread recipe with all-purpose and wholewheat flour in equal proportions. The bread also comes out beautifully this way.
Yeast: Ensure the yeast you are working with is of good quality and fresh. If you use yeast that is not fresh, you might compromise the result. Your bread may not turn out as well as you anticipated. I use instant yeast mostly for this recipe.
If you have active dry yeast, the proofing of the bread may take longer but will work well too.
Sugar: Sugar will not only help feed the yeast and hence help with the proofing process; it will give some taste to the bread. You can reduce the sugar further or substitute it with honey. In this case, use 1 & ½ tablespoons of honey instead of sugar. You can then work with a little honey also for proofing. About ¼ teaspoon.
Salt: To enjoy your bread, don’t leave out the salt. It gives the bread a delicious balanced taste that you will enjoy.
Cooking oil:Any good quality healthy cooking oil will do.
Milk or water: Milk will make your bread healthier, softer too, and more nutritious. If I don’t have milk though, I use water. The bread still turns out great with water if you don’t have milk. The bread recipe I linked above that I baked without an oven in a pan/ sufuria turned out beautifully. It was delicious as well. I used water instead of milk for that recipe. You can find it here too.
To Grease the pan: Use cooking oil, marge, or fat to grease your bread tin.
What about our oven situation? What will we use?
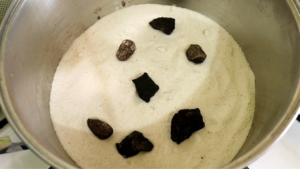
For lack of a better word, allow me to call it a micro oven since it is small and tailored to bake our bread or cakes on the stovetop or cooker.
Here is what you’ll need to create the oven:
A large pan: The pan should be wider in diameter than the bread tin you are using. The pan shouldn’t be too light. It should also have a good lid that fits well. I like one that allows the steam to escape so our bread doesn’t get soggy when the steam forms droplets on the lid that drop back on the bread. My pan has little holes in the lid through which the steam can escape.
6 to 7 small stones – about an inch to half an inch in diameter: These are not special stones in any way. I picked them from around our house now that some construction happened around our home a few years ago. I gathered small stones I could easily spot around our compound. You can find these stones anywhere.
2 to 3 cups salt: This is the normal table salt used to salt food. I use my salt for several baking episodes before getting rid of it. The salt helps protect the pan from overheating. It also helps distribute the heat so your bread or cake will bake evenly.
I trust you will enjoy your bread when you bake it this way.
Enhance your hospitality for the glory of God.
No Oven Bread on Stovetop| Make Bread Without an Oven
Equipment
- 2 mixing bowls
- 1 Wooden Spoon
- 1 Measuring Cup
- 2 tablespoons
- 1 teaspoon
- 1 Bread pan or tin (I'm using a 9" by 5" tin)
Ingredients
- 3 cups all-purpose flour
- 3 tbsps sugar
- 1 tsp instant yeast
- ½ tsp salt
- 4 tbsps cooking oil
- 1 cup warm milk
- ¼ cup warm water for proofing (You can use warm milk instead of water)
- A little cooking oil to grease bread tin (Or 1 tsp marge/ fat to grease the tin and a little flour to dust)
For the "Micro Oven"
- A large pan – wider in diameter than the bread tin you’re using
- 6 to 7 small stones – about ½ an inch to an inch in diameter
- 2 cups salt
Instructions
- Add the yeast, ½ teaspoon of the sugar, and ¼ cup warm water to a suitable bowl. Mix well with a spoon or wooden spoon.Cover with a clean kitchen towel and set aside for 10 minutes.
- Add the rest of the dry ingredients to another bowl. That is the flour, the rest of the sugar, and the salt. Give this a good mix with a wooden spoon. Set aside.
- After 10 minutes, check your yeast mixture. If it is foamy and bubbly, we will work with it. If it is not, then the yeast has probably expired. You may need to get fresh yeast for best results.

- Add cooking oil and half a cup of warm milk to the yeast mixture. Give these a good mix with a wooden spoon.
- We will add the dry ingredients to the wet in 3 batches. Add the first batch of the dry ingredients to the wet ingredients. Mix with your wooden spoon until just mixed into the wet ingredients. Add the next batch and mix the same way.Finally, add the final batch of dry ingredients to the wet ingredients. By now, the mixture will be too heavy to mix with your wooden spoon. Set the wooden spoon aside and begin to mix with your hands. Add the remaining liquid, a little at a time, until you have formed a soft sticky dough.Cover the dough with a clean kitchen towel. Let the dough rest for 10 minutes.
- After 10 minutes, transfer the dough to a floured clean surface and knead the dough for 10 minutes until soft and stretchy.

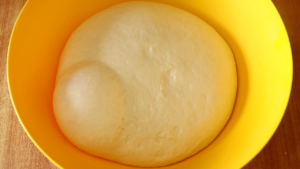
- Transfer the dough back to the bowl. Brush a little oil on the surface of the dough to keep it from drying out while proofing or rising.Transfer the dough to a warm part of your kitchen or out on a sunny day to proof for 45 minutes to one hour. It should double in size.*If the weather is cold and your kitchen is also cold, I usually create a warm microclimate by adding water to a small saucepan until quarterway in the saucepan. I will then heat the water and bring it to a boil. We will need the warmth from the water, not the heat. We don’t want the heat from the water to burn the yeast before it has a chance to help proof our bread. We will therefore cover the saucepan with a heavy kitchen towel that we’ve folded double. We will then place the bowl with the dough on the saucepan. The warmth through the towel should help provide a conducive environment for the bread to rise.
- Meanwhile, grease a suitable bread tin with some cooking oil. If you are greasing with marge or fat, grease then dust with a little flour.
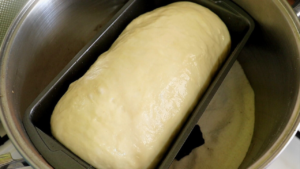
- Once the bread has sufficiently proofed and doubled in size,uncover it, beat it down then transfer it to a lightly floured surface. Knead it for a minute.Roll it out to a small rectangle that’s slightly shorter in length than your bread tin. Firmly fold it to form a rod-like shape that can easily fit into the bread tin.Transfer the dough to the bread tin. Cover with a clean kitchen towel and transfer to a warm place. Let it proof for 20 minutes.
- Meanwhile, begin to create your micro-oven. Add salt to a large suitable saucepan that is wider in diameter than your bread tin.Add 2 full cups of salt to the pan. Flatten the salt out evenly in the pan.Arrange the little stones on the salt. These stones will help keep the bread tin above the salt and not in direct contact with the pan.
- Cover the pan.10 minutes before the bread dough finishes the proofing process, place the pan with the salt and stones on your stove or cooker on full flame for 5 minutes. After 5 minutes, reduce the flame to the lowest as designed by your manufacturer. Let it continue on this low flame for another 5 minutes. This is a total of 10 minutes.
- Uncover the bread and brush the surface of the bread with a little egg wash. Uncover the pan and carefully transfer the bread to the pan, ensuring the pan doesn’t burn you. It is hot.
- Cover the pan and bake for 45 minutes to an hour dependingon your flame. It should have baked through and with a golden tinge on the surface.Once ready, switch off the flame.
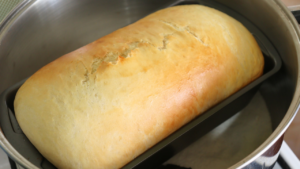
- Apply a little marge or butter on the surface so the bread will be soft and supple once it has cooled.
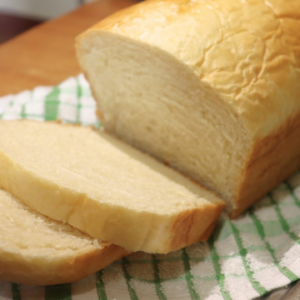
- Let it cool completely. Transfer from the tin to a suitable tray or platter. Your bread is ready for you to enjoy. Enhance your hospitality for the glory of God.

Recommended:
Kenyan No-meat Pilau Recipe| Best Pilau Recipe
Pilau Masala Spice Recipe Without a Grinder
Easiest 4-ingredient Mandazi on a Budget Recipe| Kenyan Mandazi
Cold Water Chapati Recipe| Kenyan Roti
Best Rabbit Meat Wet Fry Recipe
Easiest No-oven Granola Recipe
Basic No-oven Cake Recipe on Gas