
The Softest Enriched Chapatis with Atta (Whole Wheat Flour): A Recipe for Perfect, Layered Flatbreads
Learn how to make perfectly soft and layered chapatis with this easy recipe. Using atta (whole wheat flour), this guide provides step-by-step instructions for achieving fluffy, delicious Indian flatbreads.Find the link to the video tutorial of this recipe at the end of this post.
Equipment
- 1 Mixing Bowl
- 1 Rolling Pin
- 1 roti/ chapati pan or skillet
- measuring spoons and cups as needed
- 1 turner/ spatula (You can turn the chapatis with a tablespoon if you don't have a turner)
- 1 Wooden Spoon
Ingredients
- 4 cups whole-wheat flour/ atta (Could be slightly more or less depending on the brand or milling process) Have some extra flour on hand for dusting too.
- 1 & ½ tbsps. heaped, then melted marge/ butter (We will work separately with 1 tablespoon. The ½ tablespoon will be used later in the recipe)
- 2 tbsps. sugar (optional)
- ½ tsp. salt (If you don’t use sugar, work with a full teaspoon of salt)
- 2 cups room temperature milk
- Some cooking oil to fry
Instructions
- Begin by adding the milk to a large mixing bowl. To this, add the salt and sugar.Stir with a wooden spoon until dissolved. Add 1 tablespoon melted marge/ butter.
- First add 3 cups of the Atta flour. Mix the flour into this milk mixture using your hand. Gradually add the remaining flour and mix until a soft dough forms. Ensure you’re working with a soft dough. This is why we've added the remaining atta gradually. You might even find you'll use slightly less than a cup. A soft dough is part of the secret to achieving soft chapatis.
- Cover the dough with a clean kitchen towel and let it rest for 20 to 30 minutes. If you have more time on your hands, allow the dough to rest for up to an hour. Resting the dough allows the gluten to relax, which results in softer chapatis.
- After the dough has rested, knead it for 2 to 3 minutes.
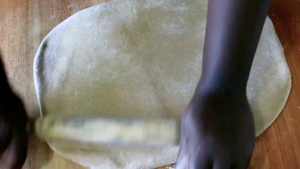
- Transfer it to a floured surface. Roll the dough to form a fairly large rectangular shape of about a centimeter in thickness.
- Evenly apply the remaining melted marge/ butter (half tbsp.) on the surface of the dough.
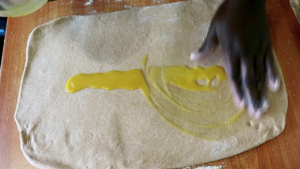
- Fold it up into a cylindrical or ropelike shape, sealing the edges as you go to trap the marge/ butter within the dough. Once you’ve folded the dough, seal off the edge along the length of the dough, again to seal in the marge/ butter.

- Use your hands or knife to cut the dough into 10 to 12 pieces, ensuring to seal each side of each piece with your hands. This will eventually work to form delightful layered chapatis. (I’m working with a 10 to 11-inch pan. If your pan is smaller, adjust accordingly and make more pieces that are smaller in size.)
- Arrange the pieces on your working surface, cover them with a clean kitchen towel and let them rest for 15 minutes. This step is optional. If you have time you can do this. If not, go ahead to the next step below.
- Roll the Chapatis. Take one dough ball and flatten it slightly with your fingers.Dust it lightly with some flour and roll it out into a thin circle using a rolling pin. Try to make the chapati as round as possible, but don’t worry if it’s slightly imperfect—it will still taste delicious! As you roll, let each piece be slightly smaller in diameter than the pan to allow sufficient space for even cooking, applying of cooking oil, and turning.Meanwhile, heat a chapati pan or flat skillet over medium heat.
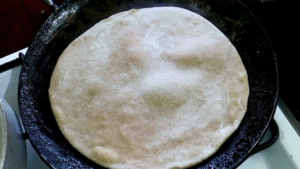
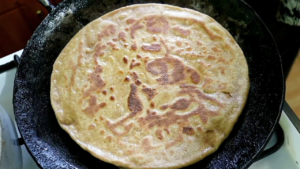
- Once the pan is hot, (Not smoking hot) place the rolled-out chapati onto the pan. As you fry, keep rolling the other chapati pieces.
- Let the chapati cook for about 30 seconds or until small bubbles start to form on the surface or the colour changes slightly.
- Apply slightly less than a tbsp. of cooking oil on the surface of the chapati then flip it over. Swirl it around the pan for the oil to spread and cook for another 30 seconds to a minute. At this point, you can press down gently on the surface with a cloth, turner, or spoon to encourage it to puff up if it's not puffed up already. This step is key to achieving soft, fluffy, layered chapatis.Swirl the chapati around the pan as often as you can. Apply another slightly less than a tbsp. cooking oil on the surface and flip it over. Swirl it around the pan and give it another 30 seconds to a minute.
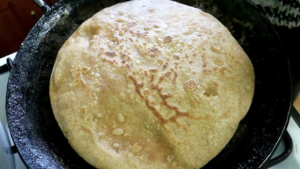
- Give the chapati a final flip and allow a few seconds before transferring to a suitable platter or hotpot lined with paper towels.
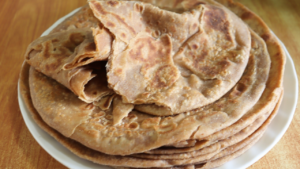
- Do the same for the remaining chapati pieces until all are done. Serve your soft, warm chapatis with your favorite curry, stew, or vegetable dish. I love them for breakfast too, accompanying them with my Kenyan tea. You can accompany them with your favorite beverage. These chapatis can also be enjoyed with a side of yogurt or chutney.
Video
Notes
Tips for Making the Softest Chapatis
-
Use good quality atta:
-
Rest the dough:
-
Don't overcook the chapatis: